

Joining two roofs with different heights can be a challenging task for any homeowner or contractor.
Whether you’re building an addition to your home or simply need to connect two existing roofs, it’s important to understand the best practices for ensuring a durable and long-lasting connection.
In this article, we’ll explore the various options for joining two roofs with different heights, including considerations for slope, drainage, and materials.
With this information, you’ll be able to make an informed decision and ensure that your roof is structurally sound and visually appealing.
Whether you’re a DIY enthusiast or a professional contractor, this guide will provide you with the insights and techniques you need to successfully join two roofs with different heights.

Assessing Roof Structures
Roof Pitch and Steepness
When joining two roofs with different heights, it’s essential to assess the roof structures of both buildings. One aspect to pay attention to is the roof pitch and steepness.
Roof pitch refers to the vertical rise of a roof for every foot of horizontal measurement. It is often given as a ratio, such as 12:12 or 8:12, which indicates the inches of vertical rise per foot of horizontal length.
To determine the pitch of your roofs, use a level and a carpenter’s square, along with a tape measure.
Place the level on the roof surface and, using the square as a guide, measure the vertical rise and horizontal run, at the most extreme point of the pitch.
Different Pitches and Heights
Joining two roofs of different heights is a complex process, especially when they have different pitches. There are two main categories of roof pitch combinations:
- Same pitch, different height: If both roofs have the same pitch, but their heights are different, it’s essential to choose a pitching point – the point where the two roofs intersect – that maintains the roof’s integrity and appearance. You must calculate the difference in height, ensuring it’s no more than three feet, as per the general rule.
- Different pitch, different height: When joining roofs with different pitches and heights, you face two primary challenges – getting the two differently pitched planes to meet at the hip or valley rafter and aligning the fascias. Start by establishing the pitch of both roof planes. Once you know the pitches, you can calculate the required cuts and angles for rafters and sleepers, ensuring a seamless and stable junction between the two roofs.
Remember to consider factors like structural load, material choices, and roof design when joining two roofs with different heights.
Consult with a professional roofer or structural engineer for guidance, as they can help you navigate the complexities of combining different roof structures safely and efficiently.

Planning the Roof Connection
Taking Accurate Measurements
To successfully join two roofs with different heights, you must first take accurate measurements. This initial step will ensure a seamless connection and prevent future issues or damage.
Begin by measuring the centerline of both roofs, as well as their heights and slopes.
Make sure to measure consistently, using the same reference points on each roof to ensure your measurements are precise. It’s also essential to factor in the required gutter or flashing space between the two roofs to prevent water intrusion.
Creating a Detailed Plan
Once you have gathered all the necessary measurements, it’s time to create a detailed plan for joining the two roofs. Start by sketching a scale drawing of the entire roof system, which should include:
- The location of exterior walls
- The positions of ridges and rafters
- The span and height difference between the two roofs
- The intended type of roof construction (e.g., truss or stick framing)
- The intended home expansion layout (if applicable)
Next, decide on how the two roofs will meet, which will depend on their pitch and height differences. If the roofs have similar pitch values, the connection may involve a simple ridge or valley joint.
In contrast, if the roofs have varying pitches, you may need to incorporate a dormer or crickets to divert water away from the connection point.
Bear in mind that your plan must also consider the structural requirements and local building codes to ensure stability and compliance. Consult with experienced professionals or seek guidance from online resources to help with this process.
In conclusion, planning the roof connection involves meticulous measurements and a well-thought-out connection design.
By taking these steps, you can confidently join two roofs with different heights while maintaining the structural integrity and visual appeal of your home.


Joining Techniques
When joining two roofs with different heights, there are various methods to achieve this while maintaining the integrity and functionality of both roofs.
In this section, we’ll explore three techniques: Using Jack Rafters, Extending the Taller Roof, and Creating a Dormer.
Using Jack Rafters
Jack rafters are shorter rafters that connect the main rafters of two roofs with different pitches. To use this method, follow these steps:
- Prepare the area by identifying where the two roofs will meet.
- Measure the length of the joined area and add 12 inches.
- Pick the section where two edges will cross.
- Install the jack rafters, ensuring they are securely attached to the main rafters.
This method enables you to join two roofs of different heights while maintaining their distinct pitches.
Extending the Taller Roof
In some cases, it may be more appropriate to extend the taller roof to meet the lower roof. This can often result in a cleaner look and might be more cost-effective.
To extend the taller roof:
- Measure the distance between the two roofs and determine the required extension.
- Remove the necessary sections of the existing roof from the taller structure.
- Install new rafters, ensuring they match the pitch and height of the original roof.
- Attach new roofing material to blend seamlessly with the existing roof.
This method might require more work, but it can provide a more uniform appearance when completed.
Creating a Dormer
A dormer is a roofed structure added to an existing roof to provide additional space, light, or ventilation. If your goal is to join two roofs with different heights while also adding architectural interest or functionality, a dormer might be an excellent option.
To create a dormer:
- Determine the location for the dormer on the lower roof.
- Cut an opening in the lower roof and install temporary supports.
- Frame the dormer using rafters, ensuring it matches the existing roof’s pitch.
- Attach exterior wall sheathing and roofing materials to the dormer.
All three techniques have their advantages, and your choice will depend on your specific situation and goals.
Always consult with a professional roofer or contractor to ensure the chosen method is appropriate for your project and accurately completed.


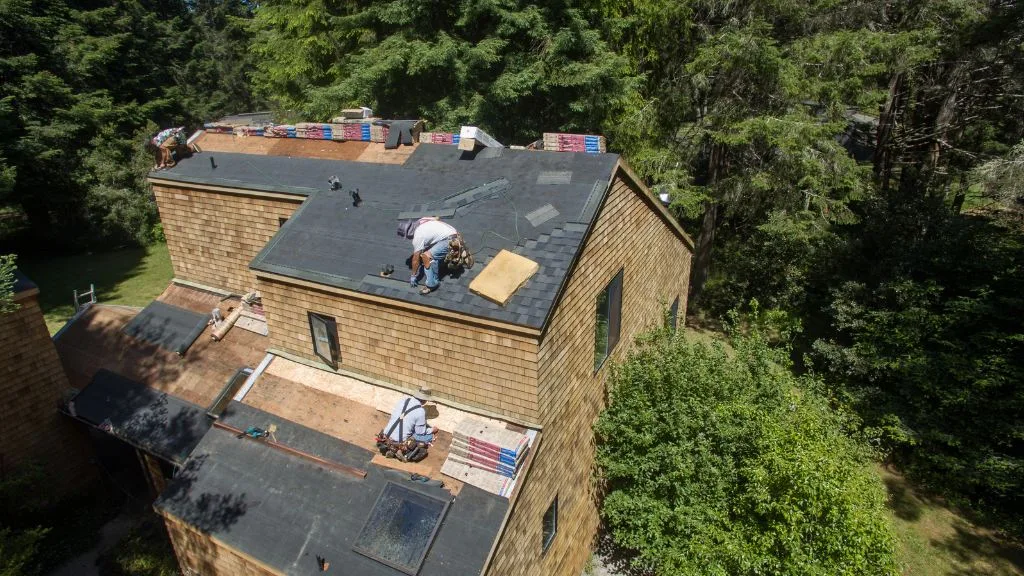
Constructing the Roof Connection
Setting Up the Ridge Board
To begin joining two roofs with different heights, start by measuring and cutting the ridge board according to the required length that connects the two roofs.
Use high-quality lumber for this critical component, as it will support the weight of the roof materials and trusses. Then, securely install the ridge board into the proper location, taking into consideration the difference in height between the two roofs.
Installing Roof Trusses and Rafters
Once the ridge board is firmly in place, proceed with placing the roof trusses on both sides of the ridge board. Start by measuring and cutting the rafters and trusses according to the appropriate lengths and angles. You’ll need:
- Jack rafters to join the ridge and valley boards
- Trusses to support the roof structure
Position the trusses and rafters to create a smooth transition between the two distinct roof heights while ensuring that they meet the design specifications.
Ensure that everything is properly aligned before securing them to the ridge board and the walls.
Follow these steps as you install trusses and rafters:
- Cut jack rafters to fit between the ridge and valley boards
- Align them with the valley boards and ridge
- Nail the jack rafters to the valley boards and to the ridge
- Place trusses on both roofs and ensure they remain upright while spacing them evenly
- Brace and nail the trusses in place
Adding Roof Sheathing
With the rafters and trusses in place, you can now attach roof sheathing, typically made from plywood or other suitable material.
Before adding the sheathing, inspect the framing for any gaps, twists or other irregularities that may cause issues when fastening the sheathing.
To install the sheathing:
- Measure and cut the plywood according to your roof’s dimensions
- Position the plywood sheathing onto the rafters and trusses, starting at the lower edge and working your way up
- Secure the sheathing by nailing or screwing it to the rafters and trusses
- Use scrap lumber or plywood to fill any gaps or irregularities in the roof structure
- Ensure that the sheathing panels are flush with one another and properly aligned
By the end of this process, you should have successfully connected the two roofs with different heights. Make sure to inspect your work for proper alignment, structural integrity, and adherence to building codes.


Finishing the Roof Connection
Installing Roof Shingles or Exterior Material
When you’re installing the roof shingles or exterior material to join the two roofs with different heights, first lay the underlayment over the sheathing.
Next, start installing the shingles or exterior material from the lower roof, working your way upward.
Make sure to overlap the materials to create a seamless transition between the two roof sections. For example:
- For asphalt shingles, follow the manufacturer’s guidelines for placement, nailing, and overlapping patterns.
- For metal roofing, align the panels with the ridge and overlap the panels in the correct sequence, securing them with fasteners as specified by the manufacturer.
Applying Flashing and Sealing the Joint
To ensure a watertight connection between the two roofs, you need to apply the appropriate flashing material and seal the joint. Follow these steps:
- Choose a metal flashing that matches your roof material for durability and compatibility.
- Install the flashing along the roof’s valley or ridge where the two sections meet. This may involve cutting or bending the flashing to fit the specific roof configuration.
- Secure the flashing with roofing nails and ensure it overlaps the shingles or panels by a few inches on each side.
- Apply a bead of butyl caulk or a suitable sealing material along the edges of the flashing to create a watertight seal.
Adding Soffit and Facing Boards
After you have installed the shingles, exterior material, and flashing, it’s time to add soffit and facing boards to both the old and new sections of the roof. This will achieve a smooth and polished look. Here’s how to do it:
- Measure the distance between the underside of the roof overhang and the top of the wall to determine the width and length of the soffit boards.
- Cut the soffit boards to the correct size and install them along the underside of the roof overhang, securing them with appropriate fasteners.
- Now, measure the length of the overhang from the wall to the edge of the roof to determine the dimensions of the facing boards.
- Cut the facing boards to size and attach them to the edge of the roof overhang, ensuring they cover the soffit boards and meet the roof’s exterior material.
By following these steps, you should have a complete and professional-looking connection between the two roofs with different heights.
Working with Professionals
Finding a Qualified Roofer
When you need to join two roofs with different heights, the first step is finding a qualified roofer. To find the right professional for your project, follow these tips:
- Ask for recommendations: Reach out to friends, family, and neighbors who have recently had roofing work done to ask for their recommendations.
- Check online reviews: Look for reviews and ratings on websites like Angie’s List, Yelp, and Google to see customer experiences.
- Verify licensing and insurance: Ensure the roofer has appropriate licenses and insurance to protect you if an accident occurs on your property.
- Request references: Ask potential roofers for a list of past clients you can contact to inquire about their experience and satisfaction.
Hiring a Contractor for a New Roof
After narrowing down your options, follow these steps to ensure you hire the right contractor for your new roof:
- Get multiple quotes: Obtain at least three detailed written estimates from different contractors to compare prices, materials, and work quality.
- Review contract details: Carefully review the contract and scope of work to ensure everything discussed during the project is included. This should cover materials, labor, cleanup, and any necessary permits.
- Consider a warranty: Ask about warranties offered by the contractor for workmanship and material directly from the manufacturer.
- Set a timeline: Establish a clear timeline for the project, including start and completion dates.
- Address communication: Effective communication is vital. Ask your contractor about their preferred method of contact and how often they will provide you with updates.
By following these steps, you can confidently hire the right professional for your roofing project and ensure a smooth and seamless process in joining your two roofs with different heights.


Extra Considerations
When joining two roofs with different heights, there are several extra considerations to keep in mind. These considerations will affect the overall construction process and the final appearance of the connected roofs.
Chimney and Ventilation Issues
It is essential to consider the chimney and ventilation when planning to join roofs with different heights. If there is a chimney, you need to ensure its location allows for proper air circulation and smoke ventilation.
Positioning the chimney at the highest point of the new roof can help facilitate airflow. You might need to extend the chimney’s height or make other adjustments depending on the new roof’s design.
Angles and Architectural Features
The angles and architectural features of the existing and new roofs play a significant role in the junction process. You should consider the pitch and slopes of each roof when planning the connection.
For instance, if the new roof has a shallower pitch than the existing one, you might need to adjust the construction to create a smooth transition between the two structures.
Here are some suggestions to help manage angles and architectural features when joining roofs with different heights:
- Study the existing roof’s pitch and find compatible angles for the new roof addition that allows seamless connection.
- In case of different pitches of two roofs, deal with proper calculations to make sure there won’t be any structural issues.
- If necessary, consult an architect or engineer to determine the best approach to join the roofs with differing heights.
Remember, it’s crucial to maintain the integrity of your roofing system while joining two roofs with different heights. Taking extra precautions to address chimney, ventilation, angles, and architectural features will help ensure a secure and functional roof junction.